The Joy of Trichromes ... with the Nintendo Gameboy
The Joy of Trichromes ... with the Nintendo Gameboy
I've been the proud owner of a Gameboy console and the Gameboy Camera since January 2023, when I managed to get my hands on one for the Shitty Camera Challenge #1990sCameraChallenge. It's been a combination that has been on my wishlist for a long time, and since I've had one it's been hard to put down. Launched in 1989, the Gameboy console went through several incarnations before the release of the Gameboy Color and the Gameboy Pocket in the late 1990s. In 1998, Nintento released the Gameboy Camera, a 128×128 pixel CMOS sensor that can store 128×112 grayscale digital images.
The Gameboy camera (released as the Gameboy Pocket Camera in Japan) is quite simply a monochrome camera that records four shades of grey to produce super low resolution images. The camera consists of an elongated game cartridge that slips into the back of the Gameboy console. At the top of the cartridge is a ball-shaped rotatable camera that contains a 0.014 megapixel sensor. Once loaded, a live image appears on the screen and the funtograph (as Gameboy photographs are known) is saved with the push of a button. As well as taking funtographs the Gameboy can review, edit, and even print images with the optional Gameboy Printer, a small thermal device that can print out postage stamp sized funtographs.
Using the Gameboy camera looks simple enough, but in truth one needs to master a few steps to produce really nice images. The Gameboy camera is actually a full spectrum device — unlike regular cameras the sensor has no infrared cut filter to stop wavelengths outside the visible spectrum from showing on the image — so in full sunlight leaves and vegetation will show up as white. The camera is really intended to be used indoors, or in overcast weather outside, when infrared wavelengths are less prone to affect the look of the final image.
Outside on sunny days, using an infrared cut filter which cuts out most infrared wavelengths, will make trees and the sky look more natural. The camera is also sensitive to stray light, so I use a lens hood to minimise the chance of light affecting the image quality. That said, the head of the Camera, which houses the lens assembly and sensor, is not impermeable to sunlight and images can look quite 'flat' if taken with the camera in the sun. But if the camera is kept in shade the final image is much more contrasty.

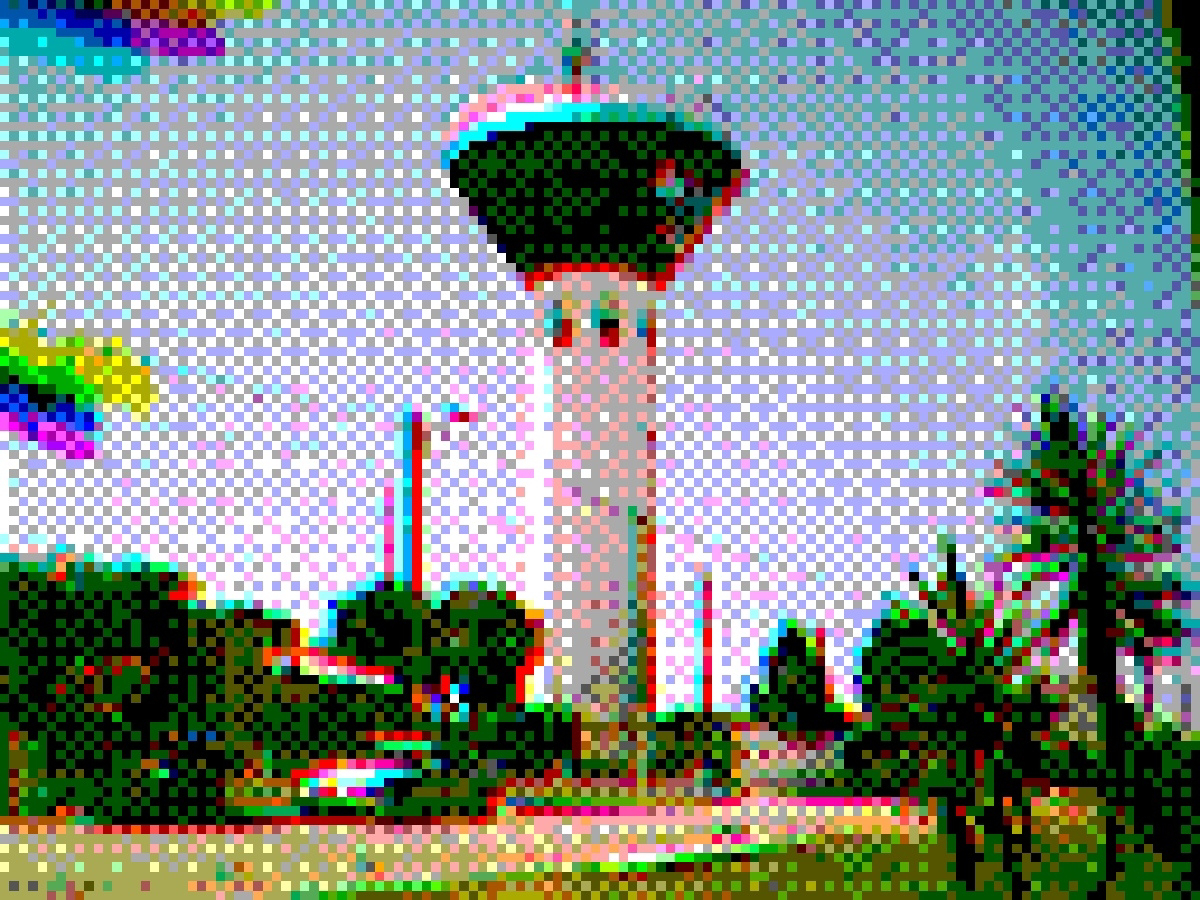
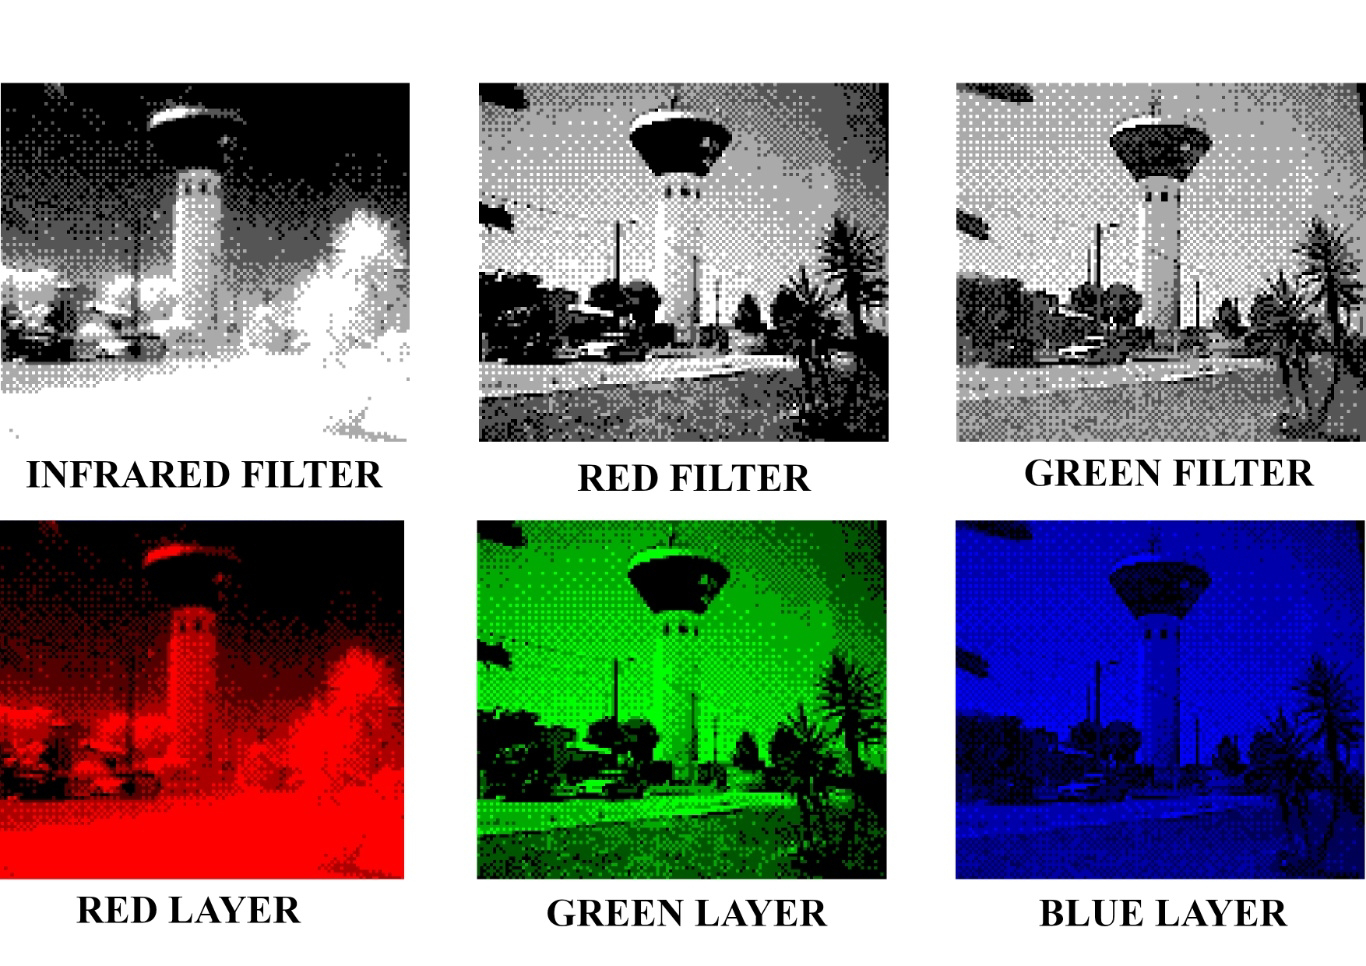
Although getting good results can be still quite hit-and-miss, the Gameboy can produce some lovely monochrome funtographs. But with a little work it can also produce some striking colour images too, and even colour images in infrared. But how can you do this, one might ask? How can you make a colour image from a camera that only takes photographs (sorry, funtographs) in black and white? The answer is to use colour filters to make a 'trichrome'. The trichrome technique has been around almost since the dawn of photography and uses red, green, and blue colour filters to produce three near-identical black and white images. When these images are combined in a photo editor like PhotoShop or GIMP, the result is a colour image.
Making a trichrome image with film has been a popular technique with black and white photographers for a long time, and the first recorded use of the Gameboy for making colour funtographs was by David Friedmann, known as Ironic Sans, in 2001. His experiments covered most of the techniques needed for making colour funtographs even then, and the technique has remained practically the same ever since. Below I have summarised my technique for producing colour funtographs with the Nintendo Gameboy.
What you will need: Obviously a Gameboy console and Gameboy Camera;
three colour filters, red, green, and blue. Photographic filters are the best if you can get hold of them, but excellent results have also been obtained with simple coloured gels;
a tripod and something to keep the Gameboy secure. I have a JOBY GripTight 360 Phone Mount, which grips the Gameboy securely and is perfect for making trichromes when attached to a tripod;
a means of downloading images from the Gameboy Camera to a computer or mobile phone. Most Gameboy funtographers should have this facility already, but I use a device called the GB Operator, which saves images as PNG files and is perfect;
a photo editing program such as PhotoShop or similar. I use GIMP, which is a powerful graphics program and is actually free.
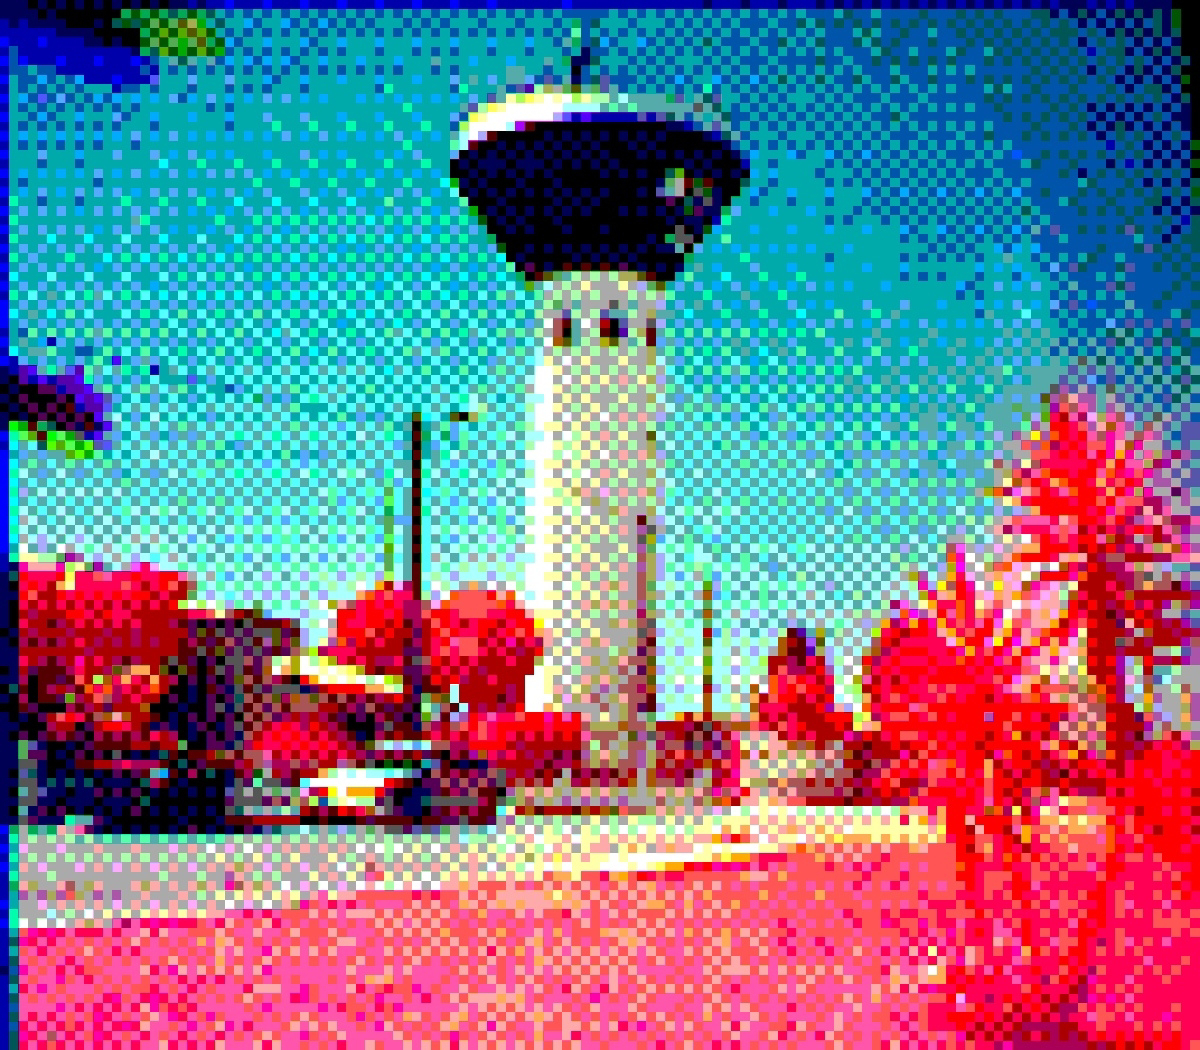
There are also a couple of items that can help get slightly better quality colour images from your Gameboy: An infrared cut filter; a filter that allows only visible light frequencies to reach the camera sensor, a lens hood — which will help minimise stray light affecting the sensor, and hence the final image — and an infrared filter. This is mainly for making infrared trichromes, or digital aerochromes, which is a fun technique.
To make a 'regular' colour trichrome with the Gameboy first find your subject. This can be anything, of course, but is always best where the subject has plenty of colour. I have found that brightly coloured subjects always give the best results. Subjects with light or pastel shades are sometimes difficult to resolve. Mount the Gameboy on the tripod and ensure it is secure. Also, if you can keep the Gameboy in the shade while maintaining the subject in sunlight your final trichrome will have more 'punch'. I have found buildings and trees very helpful, but in the worst case a good wide brimmed hat will help. You will be holding the filters over the lens and you'll need to keep it as steady as possible.
If you have an infrared cut filter, take one image with the cut filter. Hold the filter over the lens and wait for a few seconds for the camera to stabilise, then take a funtograph.
Join the cut filter to the red filter and hold the combination over the lens. Wait for the camera to stabilise and then take a second funtograph. Repeat this procedure with the green and blue filters. Finally, if you have one take an image with the infrared filter. You won't need to use the IR cut filter this time, if you do you won't see anything.
Your next step is to download the images from the Gameboy Camera to the computer. There are several methods of doing this, and I have a fabulous little device called the GB Operator. Once the funtograph files are saved to the computer (the GB Operator saves them as .png files) open them in the photo editor. You will now have to combine the three images as layers to produce the colour trichrome image.

Although I understand you can layer them in any order I normally layer them as red on top, green in the middle, and blue at the bottom. Select the blue layer image and adjust the levels as follows: Leave the blue channel at 100% and move the red and green channels to zero. Select the green layer image and copy the image. Past this as a new layer into the blue image and adjust the red and blue channel to zero. Leave the green channel at 100%. Change the blending mode of this layer to addition. This will reveal details of the layer underneath and, if necessary, you can adjust the position of the green layer so that it is perfectly overlaid on the blue layer. Finally, select the red layer image and copy this into the blue and green composite image as a new layer. Change the blue and green channels to zero, and the red channel to 100%, and the blending mode to addition. You might need to move the red layer to align the image again, but by now you should be able to see a nice coloured trichrome image.

You can also copy the different images taken with each colour filter into the red (red filter image), green (green filter image) and blue (blue filter image) channels in a new image file. This should automatically create a colour trichrome without any need for layers and blending modes. Although I have heard this works well in PhotoShop, I have never managed to get it working with GIMP. Perhaps it's just me.

To export the image, for use on social media for example, first save the image in the photo editor format (PSD for PhotoShop or XCF for GIMP). Now you will need to enlarge the image so select the 'scale' function and resize the image to a useable size. For social media I use a long edge size of 1200 pixels. When scaling the image, to preserve the square pixel shape select 'nearest neighbour' (in PhotoShop) or 'none' (in GIMP photo editor). Once the image is scaled you can save or export it as a PNG or JPG file format.
To make an infrared trichrome, you can use the same procedure as used to make a colour trichrome. However, in this instance use an infrared image in the red layer, the red filter image in the green layer and the green filter image in the blue layer. Again the blending mode of the red and green layers should be set to addition. If you are using the channel method copy the infrared image into the red channel, the red filter image into the green channel and the green filter image into the blue channel.
All being well this should give you all the information required to make really nice trichromes from your Gameboy camera.
#GameboyCamera, #Gameboy, #Nintendo, #Retro, #2Bit, #Trichrome, #Funtography, #Aerochrome, #GameboyPocket, #PixelArt,


Comments
Post a Comment